 |
being a combination of original suki pattern by Kathy Wortel and ~::~
finished size :: 23 " circumference, 16 " height
|
|
|
being a combination of original suki pattern by Kathy Wortel and ~::~
finished size :: 23 " circumference, 16 " height
|
k = knit & p = purl
s = slip one stitch, knitwise if knit row, purlwise if purl row
ssk = slip one stitch knitwise, slip one stitch purlwise, insert
left needle in front of these 2 stitches and knit 2 together
sssk = slip one stitch knitwise, slip one stitch purlwise, slip
one stitch purlwise, insert left needle in front of these 3 stitches
and knit 3 together
tw = turn work
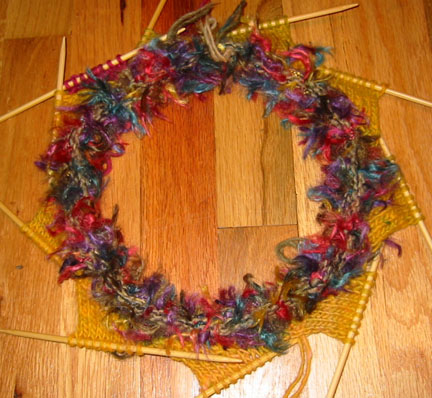
yarn : aproximately 400 yards of Noro kureyon or any worsted to bulky weight 100% wool other than superwash(superwash will not felt) . frou frou bit : whimsey or any eyelashy fun yarn
u.s. #7 needles. i used double pointed (10 of them! ) but circular would also work, perhaps 2 circulars would be more comfortable than one. i forgot to check prefelted guage, but it is not an essential here-felted each rectangle is 2 1/4 inch square. you can make the bag wider or thinner by starting with more or less stitches, they need only be divisible by 11. i made 9 rectangles per row, so i ...
**cast on 99 stitches**
with one strand kureyon and 2 strands whimsey, join and knit 5 rounds. (here also you could make more or less frou frou by adding or subtracting rows or using more or less strands of frou frou)
**base triangles. worked over 11 stitches**
row 1 : k 2 ,tw
row 2 : s 1 , p 1, tw
row 3: s 1 , k 2, tw
row 4: s 1, p 2, tw
row 5: s 1, k 2, ssk, tw
row 6: s 1, p 3. tw
row 7: s 1, k 4, tw
row 8: s 1. p 4. tw
row 9: s 1, k 5, tw
row 10: s 1, p 5, tw
row 11: s 1, k 5, ssk, tw
row 12: s 1, p 6, tw
row 13: s 1, k 7, tw
row 14: s 1, p 7, tw
row 15: s 1, k 8 ...do not turn
repeat these 15 rows till you have worked all 99 stitches. there will be 9 triangles each with 9 stitches
row 1 : begin on reverse side. pick up 8 stitches purlwise
downward along triangle. p first stitch from next needle, tw
row 2 : s 1, k 8, tw
row 3 : s 1, p 7, p 2 together, tw
row 4-16 : repeat rows 2 & 3
row 17 : s 1, p 7 ,p 2 together, do not turn...
repeat till you have worked 9 rectangles. each rectangle will have 9 stitches
row 1 : begin with right side facing. pick up 9 stitches along
rectangle. slip last picked up stitch onto left needle, ssk, tw
row 2 : s 1, p 8, tw
row 3 : s 1, k 7, ssk, tw
rows 4-16 repeat 2 & 3
row 17 : s1, k 7, ssk, do not turn
repeat till you have worked 9 rectangles. each rectangle will have 9 stitches
repeat these 2 sets of rectangle rows 3 times, then first row of rectangles once. there are now 9 rows of rectangles below beginning triangles. now we are going to make the cutest bag bottom ever...
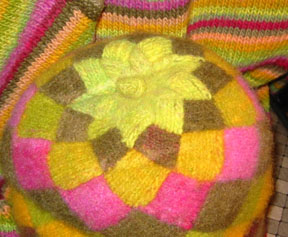
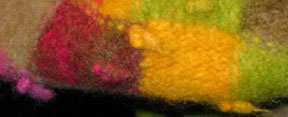
first decrease row (pink in photo)
row 1 : right side facing. pick up 8 stitches knitwise along rectangle.
slip last picked up stitch onto left needle, ssk, tw
row 2 : s 1, p 7, tw
row 3 : s 1, k 6, ssk, tw
row 4 : s 1, p 7, tw
row 5 : s l, k 6, sssk, tw (this is the different row, using an
extra stitch from previous row of rectangles)
row 6-14 : repeating rows 2 & 3
row 15 : s 1, k 6, ssk, do not turn
repeat until you have worked 9 rectangles, each containing 8 stitches
2nd decrease row (gold in photo)
row 1 : begin on reverse side. pick up 6 stitches purlwise along
rectangle. p first stitch from next needle, tw
row 2 : s l, k 6, tw
row 3 : s 1, p 5, p 2 together, tw
row 4 : s 1, k 6, tw
row 5 : s 1, p 5, p 3 together, tw (this is the different row,
using an extra stitch from the previous row of rectangles)
row 6-12 : repeat rows 2 & 3
row 13 : s 1, p 5, p 2 together, do not turn
repeat until you have worked 9 rectangles, each containing 7 stitches
3rd decrease row (gray in photo)
row 1 : right side facing, pick up 5 stitches knitwise along rectangle.
slip last picked up stitch onto left needle, ssk, tw
row 2 : s 1, p 4, tw
row 3 : s 1, k 3, ssk, tw
row 4 : s 1, p 4, tw
row 5 : s 1, k 3, sssk, tw (this is the different row, using an
extra stitch from previous row of rectangles)
row 6-10 : repeat rows 2 & 3
row 11 : s 1, k 3, ssk, do not turn
repeat until you have worked 9 rectangles, each containing 5 stitches
4th decrease row ( yellow green in photo, both 4th and
5th decrease rounds done in yellow green)
row 1 : begin on reverse side. pick up 4 stitches purlwise, slip
last picked up stitch onto left needle, p 2 together, tw
row 2 : s 1, k 3, tw
row 3 : s 1, p 2, p 2 together, tw
row 4 : s 1, k 3, tw
row 5 : s 1, p 2, p 3 together ( this is the different row, using
an extra stitch from the previous row of rectangles)
row 6 : s 1, k 3, tw
row 7 : s 1, p2, p 2 together, do not turn
repeat until you have worked 9 rectangles, each containing 4 stitches
5th decrease row
row 1 : right side facing, pick up 3 stitches knitwise along rectangle.
slip last picked up stitch onto left needle, ssk, tw
row 2 : s 1, p 2, tw
row 3 : s 1, k 1, sssk, tw
row 4 : s 1, p 2, tw
row 5 : s 1, k 1 ssk, do not turn
repeat until you have worked 9 rectangles, each containing 3 stitches
knit one round, picking up one stitch between each rectangle.
at this point i separated onto 3 needles, each with 12 stitches
(36 altogether)
k 2 together. repeat all the way around. (18 stitches)
k one round
k 2 together, repeat all the way around (9 stitches)
k one round
k 2 together 3 times, k 1 (4 stitches)
k these 4 stitches in i-cord for 3 inches. bind off, tie into knot.
knit 2 handles. i chose to make mine short. i-cords make good handles. i didn't do it that way though.
i cast on 11 stitches, knit back and forth for 14 inches, always slipping the first stitch. then i folded this in half and stitched it up.
i cord is easier : )
**felting** : i am a washing machine felter, kathy gives a good felting lesson along with her pattern, here is another good article...good luck...
**sewing on handles** after felting allows you to adjust the size of them to your liking.
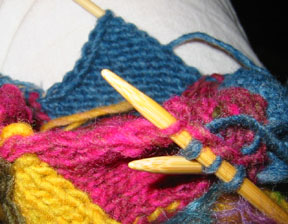
the slipped stitches make easy to see places to pick up stitches on following rows.
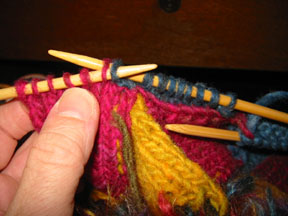
when you reach ssk, or p 2 together you should be at a stitch of a different color : )
when changing color, a square knot on the inside holds up well during felting.